My recent 365 image,'smoke', received quite a few requests for a blog post about the picture taking process, so I will try my best to explain it so you can play with it

The concept is relatively simple and all you'll need is
a remote (optional)
a tripod
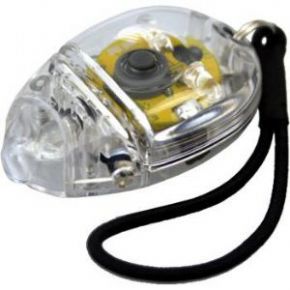
and a small handheld bike light

the one I used was three dollars in target's one spot section and it was red
and obviously your camera, but that's a given, right?
so for this photo I was shooting in complete darkness except for the bike light. my camera was set to a 5 second exposure, at f/6.3, iso 250 and the lens I was using was a 50mm
click here to see the meta data if that interests you
I wanted to keep a low ISO because I didn't want my image too be too grainy and a high f stop because I wanted most of my body to be in focus and it's difficult to work with something like 1.4 in the dark. I focused with my bedroom light on using my remote and then set the focus to manual. After that I tried to stay in the same general area of my in each photo.
I set my camera up next to my bed and started playing with moving the light across my body fast enough to where my arm wouldn't be seen. Most of you have played with 'light painting' before so you know how this works, the light creates a path. I tried to keep the light close enough to my body that it would also illuminate wherever it passed. You can see how if I wasn't completely still, there would be multiple images of my face in one frame
these are some preliminary shots


Moving the side to side can create really interesting depth in the images and help to illuminate more parts of your body

I really liked the look of the light in this image, but it was too far from my face and left a silhouette

After a while ryan hopped into bed to bug me and wouldn't leave so I started experimenting with the two of us in frame. If I came close to him we would both be in light but if I backed away I could fall completely in shadow. It was a lot of experimentation and you have a lot of control depending on how you move the light. The quicker you move, the more faint the strand is. And when you slow down the light is extremely vivid and saturated.

The length of the exposure makes these multiple ghost images easy to manipulate to your advantage. In my case, for the final image I looked in one direction for a few seconds and in the opposite direction for the remaining time. I passed the light back and forth over ryan's body and my face so that we would both be illuminated. I wish I could say this particular image was fully intentional, but it turned out to be a happy accident among a series of experiments.
and voila!! an image was born (and then made purple in photoshop!)

I recommend you just play, see how the light behaves with quicker movements, with longer exposures (or shorter ones) and with multiple subjects. I would love to play with this type of lighting more and I am looking into getting multicolored light sources.
If you end up trying this let me know, I'd love to see your results! I hope this helped or at least entertained you a little bit :)
xoxo
Lexi

I LOVE this! I may have to definitely try this!
ReplyDeleteAwesome! Thank you for the tutorial. I will definitely be trying this out. :)
ReplyDeletedefinitely want to try this eventually! thanks for the how-to :]
ReplyDeleteLove the idea, can't wait to try this out!
ReplyDeleteWill show you the result when I've tried this one.
thank you for this, Lexi! <3 i cannot wait to give this a try xx
ReplyDeletelove these. thanks for sharing.
ReplyDeleteamazin idea. the pictures look so beautiful.
ReplyDeletereally love your blog. greetings,nina!